Creating a widget with React
An easy way to get started building a React application is by using create-react-app.
You need to have a supported version of node.js installed on your computer.
Setting up a default React application
- Open up a terminal on your computer and navigate to the directory where you want your app to be.
- Type the following three commands:
npx create-react-app my-app # create the application named my-app
cd my-app
npm start # install and run the application
- You should now be able to see the default application running on your computer, go to http://localhost:3000/ with a web browser to confirm that it's running. Your application is actually served by a node.js web server, but this is only for development purposes.
- Edit the
App.jsfile so that it says "My Custom widget" instead of "Edit src/App.js and save to reload", to make sure it works.
Turning the React application into a custom widget
The minimum requirements for creating a custom widget are:
- You have an application hosted on a server somewhere. With some tweaks, the default React server running on port 3000 can be sufficient when developing.
- Your application is allowed to be rendered inside an iframe, which the
create-react-appserver is by default. - The settings on your ftrack workspace allow you to embed applications over HTTPS. The setting controlling this is at
System settings > Advanced > Custom widgets > Allowed widget URLs.
Accessing my-app from your ftrack workspace
This step is a suggestion for how to let your ftrack server access your local development via HTTPS when developing. Serving the application over HTTPS is a requirement if your ftrack workspace is also running over HTTPS.
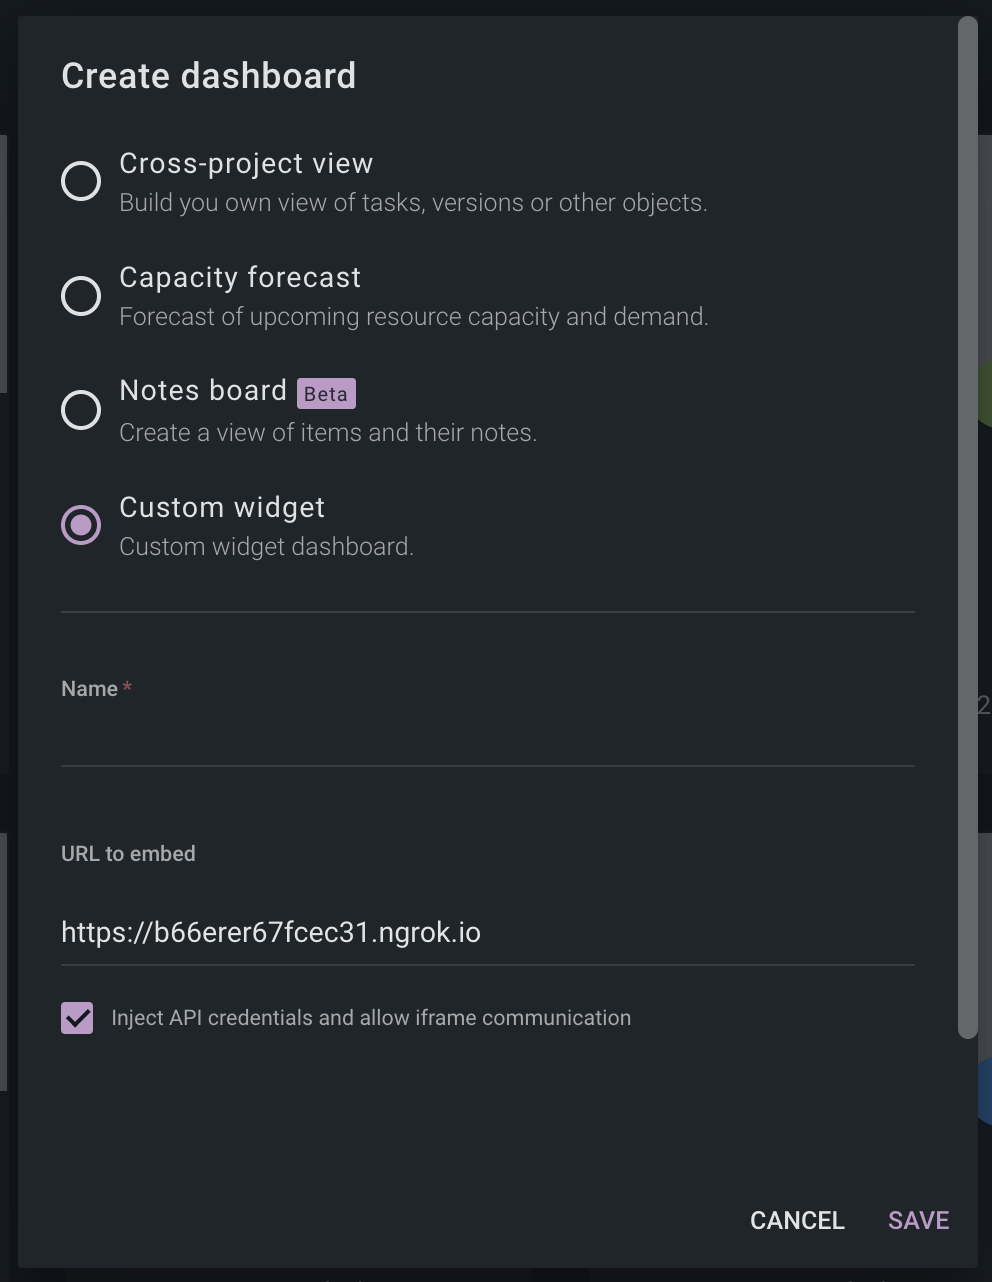
We recommend using ngrok. Point it to your my-app running on port 3000, and then copy the HTTPS URL and paste it in as the URL to embed for your custom widget. (this panel appears when clicking Create dashboard inside Overview). You should also select the checkbox "Inject API credentials" to let you receive your user API credentials directly from your ftrack server.
If you followed the steps above, you should now have your locally hosted my-app rendered inside your ftrack server. The next step is to add some functionality.
Rendering a list of all your projects
To make my-app render a list of all your projects, you need to let the application speak to your ftrack server. This is possible with our JavaScript API and helper library ftrack-web-widget.
Open up a terminal inside your my-app directory and run the following two commands:
npm install --save @ftrack/api
npm install --save @ftrack/web-widget
Entries for the JavaScript API and ftrack-web-widget should now appear in your package.js file. You now have the dependencies installed and it's time to start coding.
Before doing anything else we will create a file called session_context.js. This file will probably not make sense to you right away but it will later on help you handle your ftrack session in a clean and "React like" way.
Inside my-app/src/, create the session_context.js file containing the following content:
import { createContext, useContext } from 'react';

const SessionContext = createContext(null);

export const SessionProvider = SessionContext.Provider;

// useSession will contain our session object when
// SessionProvider is initialized. We will make sure SessionProvider
// is initialized before useSession is called.
function useSession() {
  return useContext(SessionContext);
}

export default useSession;
What happens in this file?
The SessionProvider is instantiated, but does not contain anything useful yet. Later on you will populate it with our ftrack session inside the index.js file. You can also see that we declare a function called useSession and like the name suggests, we will use it to retrieve our session later on inside our ./App.js file.
Now let us open the index.js file. This is where we will make use of JavaScript API and ftrack-web-widget. Replace the content of index.js with the following:
import React from 'react';
import { Session } from '@ftrack/api'; // ftrack session
import * as ftrackWidget from '@ftrack/web-widget'; // helper library for custom widgets
import ReactDOM from 'react-dom';
import './index.css';
import { SessionProvider } from './session_context';
import App from './App.js';

function onWidgetLoad() {
 const credentials = ftrackWidget.getCredentials();
 const session = new Session(
     credentials.serverUrl,
     credentials.apiUser,
     credentials.apiKey
 );

 session.initializing.then(() => {
    ReactDOM.render(
      <SessionProvider value={session}>
        <App />
      </SessionProvider>,
      document.getElementById('root')
    );
  });
}

/` Initialize widget once DOM has loaded. */
function onDomContentLoaded() {
  ftrackWidget.initialize({
    onWidgetLoad,
  });
}

window.addEventListener('DOMContentLoaded', onDomContentLoaded);
What happens in the code above?
At the bottom of the file we set up an event listener for DOMContentLoaded. This will trigger ftrackWidget to fetch credentials from your ftrack server and assign the value to a session variable. The session variable will then be passed in to . This is the Session provider we created in context_session.js file. As you can see it's imported at the top and rendered after we have initialized it wrapping the component so that it can be retrieved from there.
Since my-app is now dependent on credentials, it will no longer work to visit http://localhost:3000 outside of ftrack. The app will crash and complain about not having API credentials.
Now go to App.js. This is where we will make our requests to the ftrack server and later on also render the list of your projects.
import React from "react";
import useSession from './session_context';
import "./App.css";

function App() {
 const session = useSession();

 return (
  <div className="App">
    <header className="App-header">
      { session.apiUser }
    </header>
  </div>
 );
}

export default App;
If you now reload the custom widget inside ftrack you should see that it renders an empty black page with your username. The useSession function that we declared in session_context.js is working and we retrieve a working session object containing your username.
Now let's update the same file again, but this time let's use the session to make an actual query and render a list of all your projects. Update the file with the following code:
import React, { useEffect, useState } from "react";
import useSession from './session_context';
import "./App.css";

function App() {

 const [projects, setProjects] = useState([]);
 const session = useSession();

 useEffect(() => {
    // Get all projects this user has access to
    session.query('select name from Project').then(response => {
      setProjects(response.data);
    }, [session]);
 });

 return (
    <div className="App">
      <header className="App-header">
        { session.apiUser }
      </header>
      <main>
        <ul>
          { projects.map(project => (<li>{project.name}</li>)) }
        </ul>
      </main>
    </div>
 );
}

export default App;
If you don't know about useEffect and useState you can look it up in the React documentation.
The app should now render your username at the top and a list of all your projects below. Due to the default styling rules for .App-logo in App.css, the list of projects might not be completely visible at first. Let's fix this.
Final touch
To make the widget a bit nicer, move to App.css and update the file.
Add the following rule:
.App ul {
  color: white;
  list-style-type: none;
}
And change the .App-header height to 40vmin.
Making something more advanced
We will now continue to develop my-app. We will start with using the openSidebar method that comes with ftrack-web-widget. We will implement a function that opens up the side panel in ftrack when we click on a project in the list of projects inside my-app.
Go to your App.js file and import ftrack-web-widget just like you did inside index.js. If you inspect the ftrack-web-widget library you will notice that it contains a couple of functions, all with doc string explaining what they do. openSidebar is one of them and it takes two parameters entityType and entityId. For more information, please see the source.
Add the following function inside App.js before the App component.
function displayProjectInfo(id) {
  ftrackWidget.openSidebar('Project', id);
}
And then, rewrite the render method for the app component to make use of that function.
return (
  <div className="App">
    <header className="App-header">{session.apiUser}</header>
    <main>
      <ul>
        {projects.map((project) => (
          <li
            onClick={() => {
              displayProjectInfo(project.id);
            }}
          >
            {project.name}
          </li>
        ))}
      </ul>
    </main>
  </div>
);
Reload the widget in ftrack and click on the projects inside your list. They should now trigger an event resulting in the right sidebar opening.
Working with selected entities
Before we go into detail with what it means to work with "selected entities" inside your custom widget, we will first render a new instance of my-app inside ftrack. This time we will display it within the context of a dashboard belonging to a project. If you don't know what that means, things will become clear as we move on.
If you have followed the previous steps, you now have a custom widget named my-app that is displayed inside ftrack's Overview module. If you have been working with custom widgets (or "Web widgets") before, you might also know that they can be rendered inside Dashboards belonging to a specific Project.
Here is how you go about doing this:
- Inside ftrack: click
Projectsin the top menu and choose a project. - On the project page, click
Dashboards > Create dashboardand give it a name. - A modal opens up, choose
Web viewand clickDone.

Click the gear icon and enter the same type of information you did before when you created your custom widget inside Overview. Remember to select the checkbox for Inject API credentials and allow iframe communication, and click Save.
When this has been done you should now see my-app rendered, just like before. This is very similar to what you already had but now my-app has access to your "selected entity". By default that entity is the project under which it is now displayed.
How to work with selected entities?
The ftrack-web-widget module contains a function called getEntity(). This function will give you a reference to the entity that your custom widget was attached to. This can then be used to alter queries or just change the layout. Let's see an example of the latter. Update App.js accordingly:
Inside the App component:
function App() {
  const [projects, setProjects] = useState([])
  const session = useSession();
  const entity = ftrackWidget.getEntity(); // get the entity here
Inside the return statement of our App component, check if the entity.id can be matched with the id from the projects in our list. If we find a match, give that list element a class of current-project.
{projects.map((project) => (
  <li className={ entity?.id === project.id ? 'current-project' : null }
    onClick={() => {
      displayProjectInfo(project.id);
    }}
    >
      {project.name}
    </li>
))}
Now go ahead and add a current-project class in our App.css and give it some unique styling, like a color.
Reload your ftrack dashboard, and you should see your new styling applied to your current project in the project list.
entity?.id is a shorthand for writing entity && entity.id and our React app has polyfills for that.